Unix useful commands

Last update:
Basics
A Variety of shells
- bash: the default shell for Mac OSX (the Bourne Again shell)
- sh: shell (by Steve Bourne of Bell Labs)
- csh: shell with some C programming syntax
- tcsh: advanced csh (which is considered a poor scripting tool)
- ksh: the KornShell (by David G. Korn at AT&T Bell Lab; widely used among sysad and programmers)
- zsh: improved version of ksh
File system structure
/: the top-most directory/bin/: essential user command binaries (for all users)/dev/: device files/dev/: special files/etc/: system configuration files and database/home/: home directory for users/lost+found/: detached files/media/: mount points for media/mnt/: mount points for external filesystem/root/: home directory for root user/usr/bin/: additional user commands/usr/include/: standard system header files/usr/lib/: more programming libraries/usr/local/: local utilities/tmp/: temporary files (all users can write here)/usr/: applications/var/: log files, mail, other data/var/www: apatch www directory
Environment variables
HOME: Path to home directorySHELL: Path to login shellUSER: current usernamePATH: list of directories to search for commandsLOGNAME: same as USERPWD: full path of present working directoryMANPATH: list of directories of man pagesTERM: to control the display of TerminalVISUAL: names of the visual editors (e.g., vi, emacs, nano)EDITOR: names of the visual editors (e.g., vi, emacs, nano)
Variable assignment
- Do not put any space when you assign values to variables. i=0 and i = 0 are interpreted differently in bash
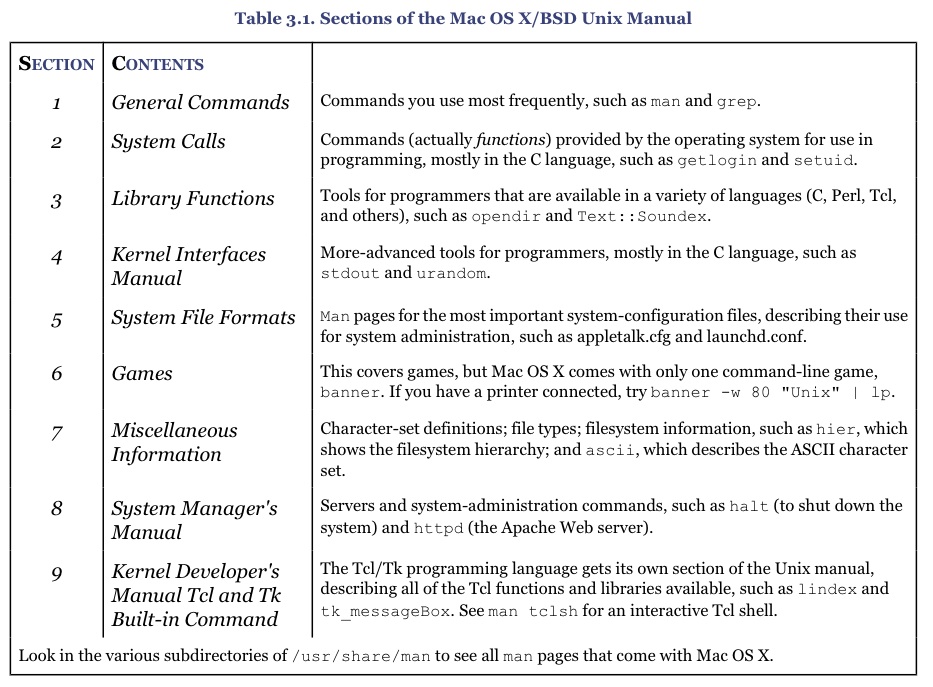
Manual pages
# Show man(ual)
man ls
man -t date | lp                     # printout the man page
man -t date > dateManual.ps
ls -help                             # see the built-in help in the command itself

# sec 1: general information         sec 2: system calls
# sec 3: library functions           sec 4: kernel interfaces
# sec 5: system file formats         sec 6: games
# sec 7: miscellaneous info          sec 8: system manager manual
# sec9: kernel developer manual
Moving around (changing current dirctory)
cd PATH      # To move the current directory
pwd          # To print the current directory
ls           # To show the contents of the current directory
cd ../       # moving up in the directory path
cd ../../    # moving up two levels higher in the directory path
Printing variables
echo "Hello $USER, welcome to Unix."     # print username
echo $BASH            # Bash path
echo $BASH_VERSION    # Bash version
echo $GROUPS          # Group number
echo $HOME            # Home path
echo $HOSTNAME        # hostname
echo $HOSTTYPE        # System hardware
echo $MACHTYPE        # Machine type
echo $OSTYPE          # OS type
echo $PATH            # Search pathes
echo $RANDOM          # Random integer 0-32767
Copying and moving files
# cp file.txt copiedfile.txt
# mv oldpath newpath
# rm fileToDelete.txt
# mkdir newDirectory
# open .

cp oldFileName newFileName                 # copy to the same directory
cp oldFileName directoryPath               # copy into a directory
cp oldFileName directoryPath/newFileName   # copy into a directory with a new name
cp file1 file2 directoryPath               # copy more than one file
# example: cp -R /etc/httpd .              # copy an entire directory (copy httpd into the current dir)
cp -R directory directryPath               # copy the contents (not an entire dir)
cp -R directory/ directryPath

# In Unix, moving means renaming
mv -i oldpath newpath/   # -i ask overwrite, the tailing / ensure directory or not

# making a new directory and its path directories
mkdir -p newDirPath/newDirPath2/newDir

# updating the file's access time on each file
touch file.txt

# removing files with Wildcard (all text files in this case)
rm *.txt
Display command-line history
history                                  # show all histories
tail history                             # only the last 5
head history                             # only the first 5
history | grep ls                        # only those contain 'ls'
Display the log file
# the default delimiter is tab (showing columns 1,2,4, and 6)
cut -f 1,2,4,6 tabDelimitedExampleFile.txt
# only the first 5 lines
cut -f 1,2,4,6 tabDelimitedExampleFile.txt | head -n 5

# display the first column of the logfile (delimiter is whitespace)
cut -d " " -f 1 /var/log/httpd/access_log
cut -d " " -f 1 /var/log/httpd/access_log | sort | uniq -c | sort -nr
Lock or unlocking the root account
# lock the root account
sudo passwd -l root

# unlock the root account
sudo passwd -u root
Show machine info (32bit or 64bit)
# the machine architecture
arch

# the processor type
machine

# os name, version, and professor type
uname -amnprsv

# host kernel
hostinfo

# host's network name
hostname

# Mac OSX only?
system_profiler | more

# current network IP address
ipconfig getifaddr en1

# reset the IP address (DHCP)
sudo ipconfig set en1 DHCP
# or give a specific IP
sudo ipconfig set en1 INFORM 192.168.0.150
Finding files
Finding files
# Find files (using the pre-compiled database)
locate security
locate security | grep Library             # in the output, grep Library
locate security | less                     # show only part of output
locate security | wc -l                    # count number of output files

# Find files (without using the pre-compiled database; takes a lot of time)
find dirname -name "pattern"               # find "pattern" in the directory
find ~ -name "Picture*"                    # find Picture* files in the home directory
find . \( -name "*.htm" -or -name "*.html" \) # searching two matches
find ~/Documents -type d                   # find directories in your Documents

# finding recently changed files (within 1 day and 90 days)
find ~ -mtime 1
find . -name "*" -mtime -90 -print
find . -mtime +7 -a -mtime -14 -print

# finding files by size
find . -size +3000k -print
find . -size +10000k -exec ls -ahl '{}' \;

# finding largest directories
du -sk ~/* | sort -nr | head -n 10

# showing the directories with their sizes
du -sk * | sort -nr

# finding all mp3 files and copy them to "Music" directory
find . -name '*.mp3' -print -exec mv '{}' ~/Music \;
Trick with for and find
for i in $(find ./dir -name "*.pdf"); do echo $i; done
for f in $(find . -mtime -7 -name "*.pdf"); do echo $f; done
Displaying disk usage
# show all directry sizes in the current directory (summary)
df -h

# show all directry sizes in the current directory
du -hc
Finding all pdf files and copy them to another directory
find . -name "*.pdf" -exec cp {} ./newDirectory/  \;

# or use rsync
find . -name "*.pdf" -exec rsync -rv {} ./newDirectory/  \;

# to save the tree structure
rsync -av --include='*/' --include='*.pdf' --exclude='*' --exclude='deprecated/' . ~/newDirectory/
Finding the path of command
# Finding the path of command
which ls                                   # find the path of ls
Sort
sort data data2                           # sort alphabetically
sort -n data data2                        # sort numerically
sort -nr data data2                       # sort numerically (reverse)
sort data | uniq                          # sort and display only one on each line
Grep
grep apple /etc/services                # search 'apple' in /etc/services
grep -ri network /System/Library/StartupItems    # -r: recursive search
                                        # -i: case-insensitive
locate Security                         # locate files with 'Security'
find ~ -name "Picture*"                 # find "Picture*" in the home directry
find ~/Documents -type d                # find directories in Documents
which ls                                # find the path of ls commmand
Editing files
Change case (uppercase or lowercase) of the file extension
for f in *.JPG; do mv "$f" "${f%.*}.jpg"; done
Editing and Viewing files
# all Japanese characters
([ぁ-ゔァ-ヺー\x{4E00}-\x{9FAF}]+)
Merging files with the common key (join)
#-----------------
## joinFile1.txt
# 1	tomato	pasta
# 2	chicken	salad
# 3	salmon	sushi
#-----------------
## joinFile2.txt
# 1	tomato	pasta
# 3	cucumber	salad
# 9	fluke	fish
#-----------------

# inner join (returning only matches) using the 1st column of each file as the key
join -1 1 -2 1 joinFile1.txt joinFile2.txt
# output looks like
# 1 tomato pasta tomato pasta
# 3 salmon sushi cucumber salad

# inner join with the 2nd field as the key
join -1 2 -2 2 joinFile1.txt joinFile2.txt
# returns
# tomato 1 pasta 1 pasta

# -a1 means to include all lines in the first file
join -a1 -1 1 -2 1 joinFile1.txt joinFile2.txt
# returns
# 1 tomato pasta tomato pasta
# 2 chicken salad
# 3 salmon sushi cucumber salad

join -a2 -1 1 -2 1 joinFile1.txt joinFile2.txt
# 1 tomato pasta tomato pasta
# 3 salmon sushi cucumber salad
# 9 fluke fish

# full outer join
join -a1 -a2 -1 1 -2 1 joinFile1.txt joinFile2.txt
# 1 tomato pasta tomato pasta
# 2 chicken salad
# 3 salmon sushi cucumber salad
# 9 fluke fish

# -o will format the output. "0" means to display the join field
join -a1 -a2 -o0 -1 1 -2 1 joinFile1.txt joinFile2.txt
# 1
# 2
# 3
# 9

# In -o X.Y, X is the filename and Y is the column number
# -o 1.1 1.2 2.1 will display the 1st and 2nd column of the first file
# and 2nd column of the 2nd file (the list must be separated with ,)
join -a1 -a2 -1 1 -2 1 -o 0,1.1,1.2,2.1,2.3 joinFile1.txt joinFile2.txt
# 1 1 tomato tomato pasta
# 2 2 chicken
# 3 3 salmon cucumber salad
# 9   fluke fish

# -e speficies the null character
join -e "NULL" -a1 -a2 -1 1 -2 1 -o 0,1.1,1.2,2.2,2.3 joinFile1.txt joinFile2.txt
# 1 1 tomato tomato pasta
# 2 2 chicken NULL NULL
# 3 3 salmon cucumber salad
# 9 NULL NULL fluke fish

# -t specifies the delimiter (you will have to copy ctr-v+tab in the commandline)
join -a1 -a2 -1 1 -2 1 -t '	' -o 0,1.1,1.2,2.2,2.3 joinFile1.txt joinFile2.txt
# or create a variable on the fly
join -a1 -a2 -1 1 -2 1 -t $'\t' -o 0,1.1,1.2,2.2,2.3 joinFile1.txt joinFile2.txt
# 1	tomato	pasta1	tomato	pasta
# 2	chicken	salad2	chicken	salad
# 3	cucumber	salad
# 3	salmon	sushi3	salmon	sushi
# 9	fluke	fish
Editing and Viewing files
# Editing files
vi
emacs
nano
pico

# Viewing files
less file.txt # one page at a time
cat file1.txt file2.txt # concatenate files
head file.txt # just the beginning of a file
tail file.txt # just the ending of a file

# Viewing meta data
ls -l path # -l for long form
ls -sk path # -s for size and -k for kilobytes
mdls path # OSX only; showing the metadata of path
Checking disk usage (directory size)
# for machine view
du -sk *
# for human view
df -h
Temporarily change the default editor
# to make the change permanent, modify /etc/profile
export EDITOR="pico"
Counting words, lines, and bytes
wc temp.txt
wc -l temp.txt                            # -l: count lines
wc -w temp.txt                            # -w: count words
wc -b temp.txt                            # -b: count bytes
Special characters
# Quotation
ls -l "Desktop DB"                  # whitespace is respected
echo 'Hello $USER'                  # this will fail
echo "Hello $USER"                  # this will work

# Backslash
ls -l Desktop\ DB                   # or use a backslash to show whitespace
Wildcard
# Glob-pattern match
ls Hello*                              # show everything begins with "Hello"
ls *.jpg                               # show all jpeg files
ls /var/log/system/log/[0-3].gz        # show 0.gz, 1.gz, 2.gz or 3.gz
Changing the modification/creation date/time of files
# changing the modification date and time
touch -mt 201002021200 file.txt

# changing the access date and time
touch -at 201002021200 file.txt
Comparing two files with diff
# simple usage
diff file1 file2

# differences side by side
diff --suppress-common-lines --speed-large-files -y file1 file2

# or use wdiff for word-level differences
wdiff file1 file2
Making a patch file
# unified format (shorter)
diff -u old new

# context format
diff -c old new

# making a patch
diff -Naur old new > patch.file

# applying a patch
patch < patch.file
Applying a patch file
# To apply a patch, one could run the following command in a shell:
# cd to the right dir and adjust the number of p (removing the heading dirs)
patch -p1 < patch.file

# Patches can be undone with the '-R' option:
patch -R < /path/to/file
Changing the contents of texts in all files in a directory
for f in *.tex ; do perl -p -i -e 's/Text1 \d\d/Text2 00/g' $f; done
# alternatively
for file in $(find . -type f -iname "*htm"); do perl -p -i -e 's/OldText/NewText/g' $file; done;
Adding the same prefix to all files in the directory
for f in *.tex; do cat prefix.tex $f > /tmp/temp; mv /tmp/temp temp/$f; done
File compression
Compress files (gzip and tar)
# .tar       tar tf (list contents), tar xf (extract)
# .tar.gz    tar tzf (list contents), tar xzf (extract)
# .tgz       tar tzf (list contents), tar xzf (extract)
# .tar.Z     tar tZf (list contents), tar xZf (extract)
# .zip       unzip

# tar and pipe to gzip
# alternatively, use tar -cvzf dir
tar -cvf - dir/ | gzip > dir.gz

# compress a file (not multiple files) with gzip
gzip temp.txt
gzip *.txt                                        # compress each of text files
grep root /var/log/mail.log | gzip > output.gz    # compress the piped output

# uncompress a gz file
gunzip temp.gz
gunzip -t temp.gz                                 # keep the original gz file
gunzip -c temp.gz | command                       # piping the uncompressed file

# combining multiple files (tape)
# -c: create a new archive, -v: verbose, -z: compress the results, -f: specify a filename
tar -cvzf newfile.tgz directoryname

# untar
tar -xvzf code.tar
Compress files (zip)
# zip files without dotfile (e.g., .DS_Store)
zip -r file.zip directory/ -x "\.*.DS_Store"

# zip files with password
zip -er file.zip directory/ -x "\.*.DS_Store"
Input and Output
STDIN and STDOUT (also STDERR)
# STDIN: Standard Input
# STDOUT: Standard Output
# STDERR: Standard Error

# Dumping the output into a null directory (output is immediately discarded)
your_command > /dev/null

# Writing and Overwriting your output
ls /Users > users.txt # create a new file (overwrite the old one, if any)
ls /Users >> users.txt # append to an existing file

# Piping
ls -l /bin
ls -l /bin | cut -c38-
Piping examples
# COMMAND > FILENAME   : redirect output to file
# COMMAND >> FILENAME  : redirect output to file (appending to file)
# COMMAND < FILENAME   : get input from file
# COMMAND_A | COMMAND_B: pipe ouptut of COMMAND_A to COMMAND_B
# COMMAND_A `COMMAND_B`: execute COMMAND_B first and then COMMAND_A

# sending the output to another file
cat sushi.txt fish.txt > sushi_and_fish.txt

# getting input from another file
sort < sushi.txt

# sending the output of one command to another command
cat sushi.txt fish.txt | sort
Looping with for
# loop with index
for ((i=0; i<10; i++)); do echo $i; done
Configurating Terminal
Add a path into PATH
# go to your home directory
cd ~/

# temporarily add your own bin file (~/bin) into your PATH
export PATH=$PATH:~/bin

# modify your PATH when you open a Terminal
# Mac OS X does not have the local bin dir by default
# add ~/bin to PATH automatically (via .profile or .bash_profile)
# .bash_profile may not exist
echo 'export PATH=$PATH:~/bin' >> .bash_profile

# HOME   : full path to home directory
# SHELL  : full path to login shell
# USER   : username (short name in Mac OSX)
# PATH   : list of directories containing commands
# LOGNAME: same as USER
# PWD    : present working direcotry
# MANPATH: list of directories containing man page
# TERM   : controlling how text is displayed
# VISUAL : name of the visual editors (e.g., vi, emacs, nano) to be used
# EDITOR : same as VISUAL
Add color-coding
# open .profile in the home directry and add those lines
export CLICOLOR=1
export LSCOLORS=exfxcxdxbxegedabagacad
export TERM=xterm-color
export PS1='\[\033[01;32m\]\u@\h\[\033[00m\]:\[\033[01;36m\]\w\[\033[00m\]\$ '
Increase the size of history
# increase the size of history (within the session)
export HISTSIZE=10000;
# increase the size of history (between sessions)
export HISTFILESIZE=10000;
Controling jobs
Seeing the current process and Stopping commands
# To run a job background
your_command & # use ampersand character at the end of command line
jobs                                 # list of job numers
fg %n                                # bring the job to foreground
bg %n                                # resume a suspended job background

ps -ax                               # To see the current processes
ps -U username                       # To see the current processes of a particular user

top                                  # To see a constantly updated list of top processes

sudo fs_usage               # continuous display of filesystem-related system
lsof                        # information about open files
latency
sc_usage
vm_stat                     # virtual memory statistics
ddb                         # debugging a running kernel

# To suspending a job
#   Press [Control] + [Z]:
# To kill a job
#   Press [Control] + [C]
#   Close the Terminal window
kill pid                             # you need to know the job process ID
Schedule jobs
# Running jobs background with crontab
crontab -l                           # see the current scheduled jobs
crontab -e                           # open editor to schedule jobs

# Add this line to schedule jobs on Friday 1am
0 1 * * 5 /bin/execute/this/script.sh

# Add this line to schedule jobs on Monday through Friday 1am
0 1 * * 1-5 /bin/execute/this/script.sh

# special keys
# @daily /bin/execute/this/script.sh
#   @reboot     Run once, at startup
#   @yearly     Run once  a year     "0 0 1 1 *"
#   @annually   (same as  @yearly)
#   @monthly    Run once  a month    "0 0 1 * *"
#   @weekly     Run once  a week     "0 0 * * 0"
#   @daily      Run once  a day      "0 0 * * *"
#   @midnight   (same as  @daily)
#   @hourly     Run once  an hour    "0 * * * *
Installing software
installing software with make
./configure
# use make -B to re-compile
sudo make
sudo make install
changing the version of gcc
cd /usr/bin
sudo ln -sf /usr/bin/gcc-4.0 /usr/bin/gcc
sudo ln -sf /usr/bin/g++-4.0 /usr/bin/g++

# don't forget to change the link of gcc to the latest version
sudo ln -sf /usr/bin/gcc-4.3 /usr/bin/gcc
sudo ln -sf /usr/bin/g++-4.3 /usr/bin/g++
Mounting external harddrive
checking external disks
diskutil list
Making backup
Backup with rsync
# copying the directories in USB to the backup directory
rsync -rv --progress ./directory ./newDirectory

# copying the monad.gc.cuny account to the backup directory
rsync -e ssh -vz user@monad.gc.cuny.edu: /Users/PATH/Documents/monadBackup/

# copying the local file to my server
/usr/local/bin/rsync -rv /Users/username/ username@serverdomain.com:/home/username/

# copying the server backup to the local machine
/usr/local/bin/rsync -rv user@serverdomain.com:/home/username/ /Users/username/

# making a backup (archive) of a remote server to an external drive
rsync -avz -e --exclude-from="/home/username/excludeRsync.txt" ssh username@remote.url.com /home/backupDir
# excludeRsync.txt will look like
bin/
dev/
lost+found/
media/
mnt/
opt/
proc/
selinux/
srv/
vmlinuz

# back up with tar
# see https://help.ubuntu.com/community/BackupYourSystem/TAR
cd /
sudo tar -cvpzf backup.tar.gz --exclude=/backup.tar.gz --exclude=/proc --exclude=/lost+found --exclude=/sys --exclude=/mnt --exclude=/media --exclude=/dev /
# then copy backup.tar.gz to whereever you want to keep the backup file
Network
Network utilities
# ping and traceroute
# ping hostname or URL
# traceroute hostname or URL
ping http://www.google.com/
traceroute http://www.google.com/

# using telnet (connecting to another machine)
telnet hostname                               # telnet is deprecated for security reasons

# using ssh (securely connecting to another machine)
ssh yourname@host.domin

# using scp (copying files between machines on a network)
scp localFile.txt user@host:copiedFile.txt

# using ftp or sftp (transferring files between machines on a network)
ftp ftpAddress
sftp sftpAddress

# searching IP address
nmblookup hostname
nmblookup -A 192.168.0.1

# check the availability of port (or use the Perl script)
telnet hostname port
Checking about users
# identifiction of current user
id

# see all user groups
getent group

# show current user's logname
logname

# list all users
finger

# a list of users logged in right now
users

# a list of users and where they logged in from
# ttyp (teletypewriter, pseudo)
who -Hu

# what logged in users are going
w

# a history of logins (at /var/log)
last
last username

# summary of login times  (at /var/log)
ac

# a list of users that belong to a group
groups username
dscl . -list / groups PrimaryGroupID
Create/modify a new group
dscl . -list /groups PrmaryGroupID

# create a new group
sudo dseditgroup -e create groupname

# display information about the group
dseditgroup group name

# add a user to the group
sudo dseditgroup -o edit -a username -t user groupname

# add a group to another group
sudo dseditgroup -o edit -a subgroup -t group parentgroup

# remove a user from a group
sudo dseditgroup -o edit -d username -t group groupname
Schedule a task
# use cron or at
Image editing (wiht imagemagick)
Converting file formats
convert simpson.jpg simpson.jpg
convert simpson.jpg simpson.png
convert simpson.jpg simpson.gif
convert simpson.jpg simpson.tiff
convert -size 200x200 simpson.jpg simpson_200x200.jpg
convert -resize 200x200 simpson.jpg simpson_200x200.jpg
convert -resize 400x400 simpson.jpg simpson_400x400.jpg
convert -resize 800x800 simpson.jpg simpson_800x800.jpg
convert -rotate 90 simpson.jpg simpson_rotate90.jpg
convert -rotate 180 simpson.jpg simpson_rotate180.jpg
convert -rotate 180 simpson.jpg simpson_temp.jpg
convert -rotate 180 -append simpson.jpg simpson_temp.jpg
convert -rotate 180 -append simpson.jpg simpson_temp.gif
convert -rotate 180 -append simpson.jpg simpson_temp.gif

# convert to gif black and white image (at a certain treshhold)
for f in *.jpg; do convert -threshold 80% $f ${f%.jpg}_80.gif; done

# adding white area around
convert simpson.jpg -bordercolor white -border 200x200 -gravity center -crop 1380x1124+0+0 simpson_border.jpg

# identify the image property
identify simpson.jpg
# without reading all image data
identify -ping simpson.jpg

# changing the image quality of jpeg
convert -quality 10 simpson.jpg simpson_quality10.jpg
convert -quality 50 simpson.jpg simpson_quality50.jpg
convert -quality 80 simpson.jpg simpson_quality80.jpg
identify -ping *.jpg
## the output is:
#simpson.jpg JPEG 1280x1024 1280x1024+0+0 8-bit DirectClass 130KiB 0.000u 0:00.000
#simpson_quality10.jpg JPEG 1280x1024 1280x1024+0+0 8-bit DirectClass 25.3KiB 0.000u 0:00.000
#simpson_quality50.jpg JPEG 1280x1024 1280x1024+0+0 8-bit DirectClass 56KiB 0.000u 0:00.000
#simpson_quality80.jpg JPEG 1280x1024 1280x1024+0+0 8-bit DirectClass 83.8KiB 0.000u 0:00.000

# changing the image quality of png
# -quality option: 1-9 zlib compression level and the PNG filtering type
# 0=none, 1="sub", 2="up", 3="average", 4="Paeth", and 5="adaptive".
convert -quality 1 simpson.png simpson_quality01.png
convert -quality 10 simpson.png simpson_quality10.png
convert -quality 15 simpson.png simpson_quality15.png
convert -quality 55 simpson.png simpson_quality55.png
convert -quality 90 simpson.png simpson_quality90.png
convert -quality 93 simpson.png simpson_quality93.png
convert -quality 95 simpson.png simpson_quality95.png
convert -quality 99 simpson.png simpson_quality99.png
convert -quality 95 -density 600x600 simpson.png simpson_quality95_highDensity.png
convert -quality 95 -density 300x300 simpson.png simpson_quality95_midDensity.png
convert -quality 95 -density 150x150 simpson.png simpson_quality95_lowDensity.png
identify -ping *.png
## output is:
#simpson.png PNG 1280x1024 1280x1024+0+0 8-bit DirectClass 601KiB 0.050u 0:00.040
#simpson_quality01.png[1] PNG 1280x1024 1280x1024+0+0 8-bit DirectClass 1009KiB 0.060u 0:00.069
#simpson_quality10.png[2] PNG 1280x1024 1280x1024+0+0 8-bit DirectClass 859KiB 0.050u 0:00.050
#simpson_quality15.png[3] PNG 1280x1024 1280x1024+0+0 8-bit DirectClass 859KiB 0.050u 0:00.040
#simpson_quality55.png[4] PNG 1280x1024 1280x1024+0+0 8-bit DirectClass 630KiB 0.060u 0:00.069
#simpson_quality90.png[5] PNG 1280x1024 1280x1024+0+0 8-bit DirectClass 737KiB 0.040u 0:00.040
#simpson_quality93.png[6] PNG 1280x1024 1280x1024+0+0 8-bit DirectClass 646KiB 0.050u 0:00.049
#simpson_quality95.png[7] PNG 1280x1024 1280x1024+0+0 8-bit DirectClass 594KiB 0.070u 0:00.060
#simpson_quality99.png[8] PNG 1280x1024 1280x1024+0+0 8-bit DirectClass 594KiB 0.060u 0:00.059

# multi-image sequence operation 'mogrify'
convert  -size 200x200 xc:none -draw 'circle 100,100 100,0' circle.gif
convert simpson_200x200.jpg  simpson_200x200.gif
mogrify -matte -draw 'image Dst_In 0,0 0,0 "circle.gif"' simpson_200x200.gif

# making thumbnails
mkdir thumbnails
# this creates image.jpg.gif
for f in *.jpg; do `convert $f -thumbnail 200x200 thumbnails/${f%.jpg}.gif`; done
# or with mogrify
mogrify -format gif -path thumbnails -thumbnail 200x200 *.jpg
# or
mogrify -format png -path thumbnails -resize 350x350 -density 600x600 -quality 95 *.pdf

# converting PDF to png
# most images are depth 8 (8 bits)
convert -density 300 -depth 8 -quality 86 simpson.pdf simpson_from_pdf.png

# crop at the center
for f in *.jpg; do convert -gravity Center -crop 88x88+0+0 $f ${f%_150x150.jpg}_88x88.jpg; done

# making different sizes of photos in a directory
for f in **[^0-9].jpg; do convert -resize 600x600 $f ${f%.jpg}_600x600.jpg; done
for f in *600x600.jpg; do convert -resize 150x150 $f ${f%_600x600.jpg}_150x150.jpg; done
for f in *150x150.jpg; do convert -gravity Center -crop 88x88+0+0 $f ${f%_150x150.jpg}_88x88.jpg; done

# making different sizes of photos in a directory (new)
for f in *.jpg; do newname=`echo $f | tr ' ' '_'`; mv "$f" "$newname"; done
mkdir thumbnails
mkdir 800x800
mkdir originals
for f in $(find . -maxdepth 1 -mtime -2 -name "*.jpg"); do convert -resize 800x800 $f ${f%.jpg}_800x800.jpg; done
for f in $(find . -maxdepth 1 -mtime -2 -name "*.jpg"); do convert -resize 400x400 $f ${f%.jpg}_temp.jpg; done
for f in *_temp.jpg; do convert -gravity Center -crop 200x200+0+0 $f ${f%_temp.jpg}_thumbnail.jpg; done
for f in $(find . -maxdepth 1 -mtime -2 -name "*thumbnail.jpg"); do mv $f thumbnails/$f; done
rm *_temp.jpg
for f in $(find . -maxdepth 1 -mtime -2 -name "*800x800.jpg"); do mv $f 800x800/$f; done
for f in $(find . -maxdepth 1 -mtime -2 -name "*.jpg"); do mv $f originals/$f; done
Changing photos' filenames based on file info
# To convert to the file creation dates (adding random number at the end)
for f in *.jp*g; do newname=`echo $f | tr ' ' '_'`; mv "$f" "$newname"; done
for f in *.jp*g; do newfile=`stat -f %Sm -t "%Y_%m_%d_%H.%M.%S" $f`; mv "$f" "$newfile"_$(($RANDOM+10000)).jpg; done
Changing photos' filenames based on exif info (using exiftool)
# Check the availability of date
exiftool -time:all -a -G0:1 -s xxx.jpg
# To convert to the photo creation dates using exiftool
exiftool "-FileName< CreateDate" -d "%Y_%m_%d_%H.%M.%S.%%e" .
# Add -1 if the creation time is the same
exiftool "-FileName< FileModifyDate" -d "%Y_%m_%d_%H.%M.%S%%-c.%%e" .
# To add random number at the end
for f in *.jpg; do mv "$f" "${f%.jpg}"_$(($RANDOM+10000)).jpg ; done
Adjusting photos' exif info (using exiftool)
# Adjust CreateDate or OriginalDate with exiftool
# adding 0 year, 0 month, 0 day, 12 hours, 0 min, and 0 sec
exiftool "-CreateDate+=0:0:0 12:0:0" .
exiftool "-DateTimeCreateDate+=0:0:0 12:0:0" .
Create photo alubms/thumbnails for lightbox
mkdir thumbnails
mkdir 600x600
mkdir originals
for f in $(find . -maxdepth 1 -mtime -10 -name "*.jpg"); do convert -resize 600x600 $f ${f%.jpg}_600x600.jpg; done
for f in $(find . -maxdepth 1 -mtime -10 -name "*600x600.jpg"); do mv $f 600x600/$f; done
for f in $(find . -maxdepth 1 -mtime -10 -name "*.jpg"); do convert -resize 200x200 $f ${f%.jpg}_temp.jpg; done
for f in *_temp.jpg; do convert -gravity Center -crop 125x125+0+0 $f ${f%_temp.jpg}_temp2.jpg; done
for f in *_temp2.jpg; do convert -resize 125x125 -background white -gravity center -extent 125x125 -format jpg -quality 75 $f ${f%_temp2.jpg}_thumbnail.jpg; done
for f in $(find . -maxdepth 1 -mtime -10 -name "*thumbnail.jpg"); do mv $f thumbnails/$f; done
rm *_temp.jpg
for f in $(find . -maxdepth 1 -mtime -10 -name "*.jpg"); do mv $f originals/$f; done
cd originals
for f in *.jpg; do echo ' ' >> temp.txt ; done

Making photos with a logo
# making photos size consistent
for f in $(find . -name "*original.jpg"); do convert -resize 2000x $f ${f%original.jpg}_2000x.jpg; done;

# change the logo size
convert -resize 600x logo.jpg logo_600x.jpg;

# add the logo to photos
for f in $(find . -name "*_2000x.jpg"); do composite -dissolve 85% -gravity northwest logo_600x.jpg $f ${f%_2000x.jpg}WithLogo.jpg; done;

rm logo_600x.jpg;
rm *_2000x.jpg;
Movie editing
Converting movie files (avi, flv, mov etc.)
# convert avi to flv
sudo apt-get install ffmpeg
sudo apt-get install mencoder
sudo apt-get install lame
ffmpeg -y -i movieFile.avi -ac 2 -ar 22050 -f flv movieFile.flv
ffmpeg -y -i movieFile.flv -sameq movieFile.mpg

# convert all files to mpg/avi (or any other format) with ffmpeg
for f in *\.flv; do ffmpeg -i $f -sameq ${f%.flv}.mpg ; done
Create (one) thumbnail
for f in *\.flv;
	do ffmpeg -an -ss 00:00:01 -vframes 1 -r 1 -i $f ${f%.flv}$t.jpg ;
done
Create a lot of thumbnails
for f in *\.flv;
	do for t in {0..10};
		do ffmpeg -an -ss $t*2 -vframes 1 -r 1 -i $f ${f%.flv}$t.jpg ;
	done;
done
Combine mpeg files
cat movie1.mpg movie2.mpg > movie.mpg
ffmpeg: getting info of movie files
ffmpeg -i video.mov
ffmpeg: encoding movie fils for i-phone movie
# codec: aac; Audio bitrate: 128kb/s; Video codec: mpeg4; Video bitrate: 1200kb/s; Video size : 320px par 180px
ffmpeg -i video.avi input -acodec aac -ab 128kb -vcodec mpeg4 -b 1200kb -mbd 2 -flags +4mv+trell -aic 2 -cmp 2 -subcmp 2 -s 320x180 -title X convertedVideo.mp4
ffmpeg: convert wave to mp3
ffmpeg -i video.avi -vn -ar 44100 -ac 2 -ab 192 -f mp3 video.mp3
ffmpeg: convert avi to wave to mp3
ffmpeg -i video.avi -ab 56 -ar 44100 -b 200 -r 15 -s 320x240 -f flv video.flv
ffmpeg: convert avi to wave to dv
ffmpeg -i video_origine.avi -target pal-dv video_finale.dv
ffmpeg: extract first page from video clips
ffmpeg -i video.mp4 -f image2 -t 0.001 image.png
for f in *\.mp4; do ffmpeg -i $f -f image2 -t 0.001 ${f%.mp4}.png ; done
for f in *\.mp4; do ffmpeg -i $f -f mjpeg -itsoffset 1 -vframes 1 ${f%.mp4}.jpg ; done
ffmpeg: extract images from video clips
# -t: duration -ss: start time
ffmpeg -t 00:00:02 -i movie.mov image%02d.png
Java
Installing Java SDK
# installing with apt-get
sudo apt-get install sun-java6-jre sun-java6-plugin sun-java6-fonts

# checking Java version
Java -version
Installing Ant ('make' for Java)
# installing ant with apt-get
sudo apt-get install ant
OSX only
pasteboard
# pasteboard
pbcopy < file.txt
pbpaste > file.txt
show extended attributes of files
ls -l@
Making random numbers
# Random number between 0 to32767
echo $RANDOM
# Random number based on the time seed
date | md5sum | cut -c -10
Shell: showing the local machine status
#!/bin/sh
# show the status of the machine

# this is my first shell script
echo "System Status Report"
date
echo -n "system uptime and load:" ;uptime
echo -n "Operating System: " ; sysctl -n kern.ostype
echo -n "OS Version: " ; sysctl -n kern.osrelease
echo -n "OS Revision number: " ; sysctl -n kern.osrevision
echo -n "Hostname: " ; sysctl -n kern.hostname

bytes=`sysctl -n hw.physmem`
megabytes=`expr $bytes / 1024 / 1024`

echo "Physical memory installed (megabytes): $megabytes"
Copying files across the Internet (scp)
# scp (secure copy) is much like cp
scp existingFile.txt newFile.txt

# between two machines
# the localfile.txt is interpreted as a path relative to the home directory (~/)
scp localFile.txt user@host:newFile.txt
Changing password
# changing the password
sudo passwd user name
Rebuild the LaunchService database
/System/Library/Frameworks/CoreServices.framework/Versions/A/Frameworks/\
	LaunchServices.framework/Versions/A/Support/lsregister \
	-kill -r -domain local -domain system -domain user
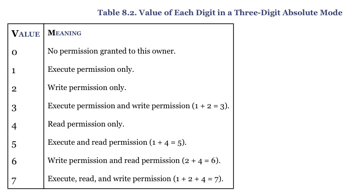
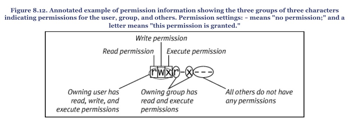
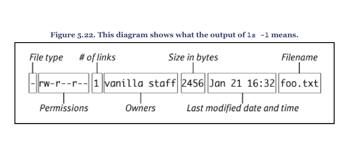
File permission
- File permission
- Directory permission
- execute permission is required for a user to cd into a directory.
- read permission is required for a user to use a command such as ls
- execute-only permission allows a user to access the files in a directory as long as the user knows the names of the files in the directory and the user is allowed to read the files.
- write permission allows the user to create, delete, or modify any files or subdirectories, even if the file or subdirectory is owned by another user.
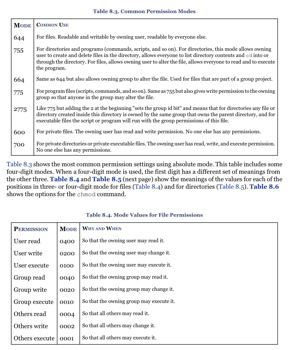
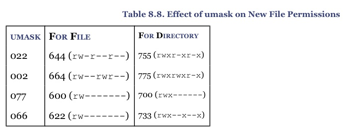
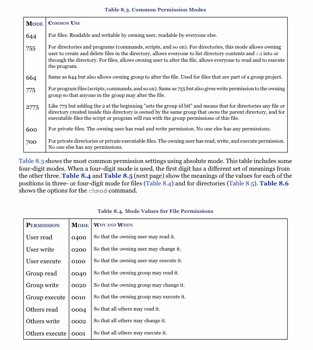
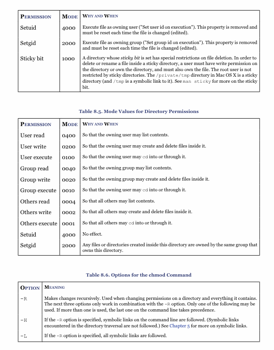
Changing file permission
# changing permission
chmod 755 file.txt

# changing permission recursively
chmod -R 0755 directory

# changing permission of all pdf files
find /data/papers -name "*.pdf" -exec chmod 755 {} \;
Unix for poets (by Kenneth Church)
- The commands below were from "Unix for poets" (Church, 1994)
- Use this file (Genesiss)
Counting words in text
# translate the complement (-c) of all alphabets ([A-Z][a-z]) with the squeeze option (-s)
tr -sc '[A-Z][a-z]' '[\n*]' < genesis.txt | sort | uniq -c

# get the first few lines of genesis
sed 5q < genesis.txt

# piping two commands
tr -sc '[A-Z][a-z]' '[\n*]' < genesis.txt | sed 5q
tr -sc '[A-Z][a-z]' '[\n*]' < genesis.txt | sort | uniq -c | sed 5q

# first translate lower case to upper case
tr '[a-z]' '[A-Z]' < genesis.txt | tr -sc '[A-Z][a-z]' '[\n*]' | sort | uniq -c

# counting only vowels
tr -sc 'AEIOU' '[\n*]' < genesis.txt | sort | uniq -c

# counting only consonants
tr -sc 'BCDFGHJKLMNPQRSVWXYZ' '[\n*]' < genesis.txt | sort | uniq -c
Sort
# sort -d    : dictionary order
# sort -f    : fold case
# sort -n    : numeric order (frequency)
# sort -nr   : revserse numeric order
# sort -u    : remove duplicates
# sort +1    : start with filed 1
# sort +0.50 : start with 50th character
# sort +1.5  : start with 5th character of filed 1

# sorting by the word frequency
tr -sc '[A-Z][a-z]' '[\n*]' < genesis.txt | sort | uniq -c | sort -nr

# sorting with fold case
tr -sc '[A-Z][a-z]' '[\n*]' < genesis.txt | sort | uniq -c | sort -f

# sorting with rhyming order
tr -sc '[A-Z][a-z]' '[\n*]' < genesis.txt | sort | uniq -c | rev | sort | rev
Bigram
# save the words into a file, then create a next-word file (by starting line 2 with tail)
tr -sc '[A-Z][a-z]' '[\n*]' < genesis.txt > genesis.words
tail +2 genesis.words > genesis.nextwords
paste genesis.words genesis.nextwords

# counding the bigram frequency
paste genesis.words genesis.nextwords | sort | uniq -c > genesis.bigrams

# the five most frequent bigrams
sort -nr < genesis.bigrams | sed 5q

# counting trigrams
tr -sc '[A-Z][a-z]' '[\n*]' < genesis.txt > genesis.words
tail +2 genesis.words > genesis.nextwords
tail +3 genesis.words > genesis.nextwords2
paste genesis.words genesis.nextwords genesis.nextwords2 | sort | uniq -c > genesis.trigrams
Shell script
# shell script for trigram count
# usage: sh trigram.sh
# use $$ to encorde the process ids into the names of temp files
tr -sc '[A-Z][a-z]' '[\n*]' > $$words
tail +2 $$words > $$nextwords
tail +3 $$words > $$nextwords2
paste $$words $$nextwords $$nextwords2 | sort | uniq -c

# remove the temporary files
rm $$words $$nextwords $$nextwords2
grep
# getting the first 5 lines that match the grep search
grep 'the land of' genesis.txt | sed 5q
# counting the trigram of the grep matches
grep 'the land of' genesis.txt | sh trigram.sh | sort -nr | sed 5q
# GREP Functions
# grep gh find lines containing 'gh'
# grep 'ˆcon' find lines beginning with 'con'
# grep 'ing$' find lines ending with 'ing'
#
# grep –v gh delete lines containing 'gh'
# grep –v 'ˆcon' delete lines beginning with 'con'
# grep –v 'ing$' delete lines ending with 'ing'
#
# grep -i '[aeiou] -i is case insensitive flag
# grep '[A–Z]' lines with an uppercase char
# grep 'ˆ[A–Z]' lines starting with an uppercase char
# grep '[A–Z]$' lines ending with an uppercase char
# grep 'ˆ[A–Z]*$' lines with all uppercase chars
#
# a match the letter 'a'
# [a–z] match any lowercase letter
# [A–Z] match any uppercase letter
# [0–9] match any digit
# [0123456789] match any digit
# [aeiouAEIUO] match any vowel
#
# [ˆaeiouAEIOU] match any letter but a vowel
# . match any character
# ˆ beginning of line
# $ end of line
# x* any number of x
# x+ one or more of x
# xy x or y
# (x) override precedence rules
# Negative regular expression search (finding that DOES NOT contain "WORD")
^((?!WORD).)*$
sed and awk
# skipped as Perl and Python became more popular choices
# see Church (1994) if you want to know about those programs
Useful commands and scripts
READ CH9 of UNIX FOR OSX- Save your own .sh files into your local bin (~/bin)
- Execute sh files
Delete dot files
# Delete dot files created on OSX
find . -name '._*' -exec rm {} \;
find . -name '.DS_Store' -exec rm {} \;
Randomize lines (perl solution)
# There is no random in OSX
cat temp.txt | perl -wnl -e '@f=<>; END{ foreach $i (reverse 0 .. $#f)
	{ $r=int rand ($i+1); @f[$i, $r]=@f[$r,$i] unless ($i==$r); }
	chomp @f; foreach $line (@f){ print $line; }}' > tempRandomized.txt
Change filenames in a directory (perl solution)
# Perl flags -n: assume while(<>) -w: show warnings -e: command line Perl
ls *.jpg | perl -nwe 'chomp; next unless -f $_; $r=sprintf  "%03d",$i++;print `ln "$_" $r.jpg`'

# including files in the subdirectories
find . -name "*.jpg"| perl -nwe 'chomp; $r=sprintf "%03d",$i++; print `mv "$_" $r.jpg` '

# capitalize filenames
for i in *; do first=$(echo "${i:0:1}" | tr '[:lower:]' '[:upper:]'); new=$first${i:1}; mv "$i" "$new"; done
Change filenames in a directory (bash solution)
# simple solution to changing filenames in a directory
find . -type f -name "*.jpg" -exec echo "mv '{}' '{}'" \; | sed 's/OLDNAME/NEWNAME/2' | /bin/sh

# changing filenames to time stamps
# Dropbox like time samps
for f in *.JPG; do newfile=`stat -f %Sm -t "%Y-%m-%d %H.%M.%S" $f`; mv "$f" "$newfile".jpg; done
# avoiding the same time stamps problem
for f in *.jpg; do newfile=`stat -f %Sm -t "%Y_%m_%d_%H.%M.%S" $f`; mv "$f" "$newfile"_$(($RANDOM+10000)).jpg; done
Change filenames in a directory (bash solution)
- You cannnot put extra whitespace in Bash command (i=0 is fine but i = 0 will be an error)
#!/bin/bash
index=0
for file in `ls *.jpg`
	do
	newName="thumbnail"$index".jpg"
	echo "moving "$file "to " $newName
	mv $file $newName
	index=`expr $index + 1`
done

# or one-line versions
i=0; for f in *.jpg ; do i=`expr $i + 1`; mv $f "newname_$i.jpg"; done
# removing tails
for f in *getRidOfTail.extension ; do mv "$f" "${f%getRidOfTail.extension}NewTail.extension"; done
# removing prefix
for f in getRidOfPrefix.*; do mv "$f" "${f#getRidOfPrefix}"; done
# remove all whitespace etc.
for f in *.flv ; do newname=`echo $f | tr -d ' ()'` ; mv "$f" "$newname"; done
# change filenames to lowercase
for f in *.pdf; do newname=`echo $f | tr '[A-Z]' '[a-z]'`; mv "$f" "$newname"; done
f='THIS FILE'; echo `echo $f | tr '[A-Z]' '[a-z]'`
# change filenames to titlecase (capitalized the beginning of words)
for f in *.pdf; do newname=`echo "$f" | perl -wlp -e 's/(\S+)/\u\L$1/g;'`; mv "$f" "$newname"; done

###################################################
# bash filename manipulation
###################################################
name:number:number     substring, staritng character, length
#name                  length of the string
name#pattern           remove prefix (minimal match)
name##pattern          remove prefix (maximum match)
name%pattern           remove suffix (minimal match)
name%%pattern          remove suffix (maximum match)
name/pattern/string    replace (first occurance only)
name//pattern/string   replace (all occurances)
Encrypting a text file with OpenSSL
# Encrypt the file:
openssl des3 -in file.txt -out encryptedFile.txt

# Decrypt the file:
openssl des3 -d -in encryptedFile.txt -out file.txt
Zipping files with password
zip -e file.zip file.txt
Removing the first line of all files
for f in *\.txt; do perl -pi -e '$_ = "" if ($. == 1);' $f; done
Regular expressions for Japanese (ひらがな、カタカナ、 and 漢字)
# Regex for matching ALL Japanese common & uncommon Kanji (4e00 – 9fcf)
([一-龯])

# Regex for matching Hirgana or Katakana
([ぁ-んァ-ン])

# Regex for matching Non-Hirgana or Non-Katakana
([^ぁ-んァ-ン])

# Regex for matching Hirgana or Katakana or basic punctuation (、。’)
([ぁ-んァ-ン\w])

# Regex for matching Hirgana or Katakana and random other characters
([ぁ-んァ-ン!:/])

# Regex for matching Hirgana
([ぁ-ん])

# Regex for matching full-width Katakana (zenkaku 全角)
([ァ-ン])

# Regex for matching half-width Katakana (hankaku 半角)
([ァ-ン゙゚])

# Regex for matching full-width Numbers (zenkaku 全角)
([0-9])

# Regex for matching full-width Letters (zenkaku 全角)
([A-z])

# Regex for matching Hiragana codespace characters (includes non phonetic characters)
([ぁ-ゞ])

# Regex for matching full-width (zenkaku) Katakana codespace characters (includes non phonetic characters)
([ァ-ヶ])

# Regex for matching half-width (hankaku) Katakana codespace characters (this is an old character set so the order is inconsistent with the hiragana)
([ヲ-゚])

# Regex for matching Japanese Post Codes
/^¥d{3}¥-¥d{4}$/
/^¥d{3}-¥d{4}$|^¥d{3}-¥d{2}$|^¥d{3}$/

# Regex for matching Japanese mobile phone numbers (keitai bangou)
/^¥d{3}-¥d{4}-¥d{4}$|^¥d{11}$/
/^0¥d0-¥d{4}-¥d{4}$/

# Regex for matching Japanese fixed line phone numbers
/^[0-9-]{6,9}$|^[0-9-]{12}$/
/^¥d{1,4}-¥d{4}$|^¥d{2,5}-¥d{1,4}-¥d{4}$/

Hiragana = [ぁ-ゔゞ゛゜ー]  // 0x3041-0x3094, 0x309E, 0x309B, 0x309C, 0x30FC
Katakana = [ァ-・ヽヾ゛゜ー]  // 0x30A1-0x30FB, 0x30FD, ヾ, 0x309B, 0x309C, 0x30FC
Hiragana or katakana = [ぁ-ゔゞァ-・ヽヾ゛゜ー]  // 0x3041-0x3094, 0x309E, 0x30A1-0x30FB, 0x30FD, ヾ, 0x309B, 0x309C, 0x30FC
Executing .sh files
# execute sh files
sh helloWorld.sh
bash helloWorld.sh

# change the permission to executable and execute
chmod +x file.sh
./helloWorld.sh
Show calendars and current dates
cal                                 # show calendar
cal 01 2001                         # show 2001 January calendar
date                                # show today's date
Combining files line by line
# use paste
paste -d " " temp.txt temp2.txt > temp3.txt
Printing tab-delimited file in the column format
# with printf
Comverting text files to PDF (text to pdf)
#!/bin/bash
echo "$@"
for f in "$@"
do
/usr/sbin/cupsfilter $f > ${f%.txt}.pdf ;
done

# or from the commandline use
for f in *\.txt; do /usr/sbin/cupsfilter $f > ${f%.txt}.pdf ; done

# more complex implementation
#!/bin/bash
#!/bin/bash

for f in $@;
do
	cat $f > temp ; \
	textutil -convert rtf -font 'Courier New' -fontsize 9 temp -output ${f%.txt}.rtf ; \
	cupsfilter ${f%.txt}.rtf > ${f%.txt}.pdf ; \
	rm temp ;\
	rm ${f%.txt}.rtf ;\
done
Comverting text file format (txt, rtf, rst, markdown etc)
# install pandoc with a binary file
# https://github.com/jgm/pandoc

# converting html to makrdown text file
pandoc --no-wrap --from html --to markdown -o file.txt file.htm

# converting html to rst file
pandoc --no-wrap --from html --to rst -o file.txt file.htm

# converting markdown textfile to rtf
pandoc --no-wrap --from rst --to markdown -o file.txt file.rst
Converting image files (PDF, EPS, JPG, GIF etc.) in a directory
#!bin/bash
# cd to the directory where your original images exist
for f in *\.gif
do
# echo ${f%.gif}
# echo $f
convert $f -compress none eps2:${f%.gif}.eps
done

# or use one liner
for f in * ; do `convert -quality 100% $f ${f%pdf}gif` ; done

# if 'convert' is not good enough, use Mac OSX specific command 'sips'
for f in *\.pdf; do sips -s format png --resampleWidth 250 $f --out ${f%.pdf}.png ; done
MySQL command-line admin
sudo mysql -u root -p
mysql> show databases ;
mysql> create database DATABASE ;
mysql> use DATABASE ;
mysql> create table TABLE ;
mysql> describe TABLE ;
mysql> show tables ;
mysql> select * from TABLE ;

# adding a user
mysql> use mysql ;
mysql> show tables ;
mysql> insert into user (Host, User, Password, Select_priv) VALUES ('', 'wikiuser', password('wikipasswd'), 'Y') ;
mysql> flush privileges ;
mysql> grant all privileges on wikidb.* to wikiuser ;
mysql> flush privileges ;
tidy (cleaning up HTML)
# cannot overwrite the original file
cp index.htm index.backup.htm
tidy -utf8 -wrap 500 -indent -clean index.backup.htm > index.htm
change PDF
gs -q -dNOPAUSE -dBATCH -sDEVICE=pdfwrite -sOutputFile=newPDF.pdf -c .setpdfwrite -f oldPDF.pdf
htaccess and htpasswd
# create a hidden file .htaccess and add the following contents
AuthUserFile /var/www/html/private/.htpasswd
AuthGroupFile /dev/null
AuthName "My Private Directory"
AuthType Basic

<Limit GET POST>
require valid-user
</Limit>

# then create a htpasswd file somewhere safe
htpasswd  -c /etc/httpd/conf/.htpasswd  testusr
# change permission if necessary
chown apache.apache  /etc/httpd/conf/.htpasswd

# sometimes you have to change httpd.conf file so that .htaccess can override
# the default setting
<Directory "/var/www/html">
  AllowOverride AuthConfig
  Order allow,deny
  Allow from all
</Directory>

# if virtualhost
<VirtualHost www.cbtcandy.org>
  DocumentRoot /var/www/html/cbtcandy
  ServerName www.cbtcandy.org
  <Directory /var/www/html/cbtcany>

    AllowOverride AuthConfig
    Order allow,deny
    Allow from all
    Options -Indexes
  </Directory>
</VirtualHost>

# restart apatche
sudo /etc/init.d/apache2 restart
disable directory listing in apache2
sudo pico /etc/apache2/sites-available/default
# change from
#    Options -Indexes FollowSymLinks MultiViews
# to
#    Options -Indexes FollowSymLinks MultiViews
sudo /etc/init.d/apache2 restart
flatten directories and move all files to one place
#!/bin/bash
for dir in *; do
if [ -d "$dir" ]; then
	cd "$dir"
	for file in *.mp4; do
		newname="${dir}_`echo $file`"
		echo "renaming $file to $newname ..."
		# remove the echo from the next line to do the actual renaming
		echo `mv "${file}" "${newname}"`
		done
		cd ..
fi
done
echo `mkdir ../foo`
echo `find . -type f -name "*.mp4" -exec mv \{\} ../foo/ \;`
List directries in a tree format
# from http://www.centerkey.com/tree/
ls -R | grep ":$" | sed -e 's/:$//' -e 's/[^-][^\/]*\//--/g' -e 's/^/   /' -e 's/-/|/'

# or download 'tree' at http://mama.indstate.edu/users/ice/tree/
# alternatively sudo port install tree
tree -d thisDir
MacPort (re-installed on Mac OS 10.6.2)
- For some reason, MacPort spits an error and needs to be re-installed on OS10.6.2
# see
# https://trac.macports.org/wiki/Migration
# https://trac.macports.org/ticket/21695
# http://www.macports.org/install.php
cd MacPorts-1.9.2
./configure
make
sudo make install						# install a new MacPort
port installed > myports.txt			# save the list of installed ports
sudo port -f uninstall installed		# uninstall all the ports
sudo port clean --work --archive all	# clean all ports
sudo port install autoconf automake ImageMagick ...
Using Subversion (svn)
# copy NLTK subversion repository to localdisk
cd ~/nltk
svn checkout http://nltk.googlecode.com/svn/trunk/nltk/

# rsync subversion local repository with the working copy
/usr/local/bin/rsync -Dgloprtz --delete --exclude=".svn/" --progress USERNAME@HOSTNAME:/var/www/workingPath/ ~/subversion/localRepPath/


###########
# Google Code
###########
# see xahlee.org/UnixResource_dir/svn.html
# check out projectname trunk
cd ~/projectname
svn checkout https://projectname.googlecode.com/svn/trunk/ projectname --username GOOGLE_USERNAME
# upload proejct files (note: the google code password is different from one for gmail)
svn import ~/subversion/projectname https://projectname.googlecode.com/svn/trunk/ -m "first import of the project"

# show changes (comparing rep and working dir)
svn info path/projectname
svn status path/projectname
svn update path/projectname

# add or delete local working files
svn add path/filename
svn delete path/filename

# send locally updated files to subversion repositiory
svn commit path/projectname/ -m "some comments about the update"

# remove all .svn directories
find . -name .svn -print0 | xargs -0 rm -rf
find . -name .svn -exec rm -rf {} \;
Clearing the screen
# clear the terminal window
clear

# resetting the terminal display (e.g., when you printed binary files by mistake)
reset
Looking up commands
# looking up commands with key terms
apropos network
Printing man page
# col -b will remove the backspace
man grep | col -b > grep.txt
Downloading files on the Internet (ftp)
# curl supports http, https, ftp, gopher, dict, telnet, ldap, and file
curl http://www.domain.com
curl ftp://www.domain.com --user username:passowrd

# temporary save login data
curl --cookie-jar cjar -data "username=username&password=password" -location "http://www.website.com/login.htm"
curl -b cjar http://www.website.com/

# wget
wget -m ftp://USERNAME:PASSWORD@FTP.SERVER.HOST:/DIR/SUBDIR/
# this doesn't download entire website (only linked ones)
wget -r -np http://www.domain.com/directory
# this one will download all files
wget -r ftp://username:password@domain.com/directory/
# if wget failed in the middle, resume with -nc (no-clobbing) option
wget -r -nc ftp://username:password@domain.com/directory/
Downloading files on the Internet (password protected website)
wget -r --save-cookies cookies.txt --keep-session-cookies --post-data 'userid=USERNAME&password=PASSWORD' https://www.loginpage.com
Check who logged in
w		# show who is logged on and what they are doing
last	# show listing of last logged in users
who		# show who logged on
Using Google text-to-speech (tts) with wget
# saving word "bilk" as "bilk.mp3"
wget -q -U Mozilla -O bilk.mp3 "http://translate.google.com/translate_tts?tl=en&q=bilk"
Controlling Spotlight indexing (Mac OSX only)
# turning off the sportlight indexing at /Volumes/EXTERNALDRIVE/
sudo mdutil -i off /Volumes/EXTERNALDRIVE/

# turning on the sportlight indexing at /Volumes/EXTERNALDRIVE/
sudo mdutil -i on /Volumes/EXTERNALDRIVE/

# see man page for more info
man mdutil
Add date stamp to the file name
# change file name (adding the date time stamp)
mv file.pdf file`/bin/date "+%Y%m%d"`.pdf
Process file line by line (bash)
cat temp.txt | while read line;
`echo $line`
done